This model has been discontinued.
ST100AS Drip & Soak Tape Vegetable Watering Kit
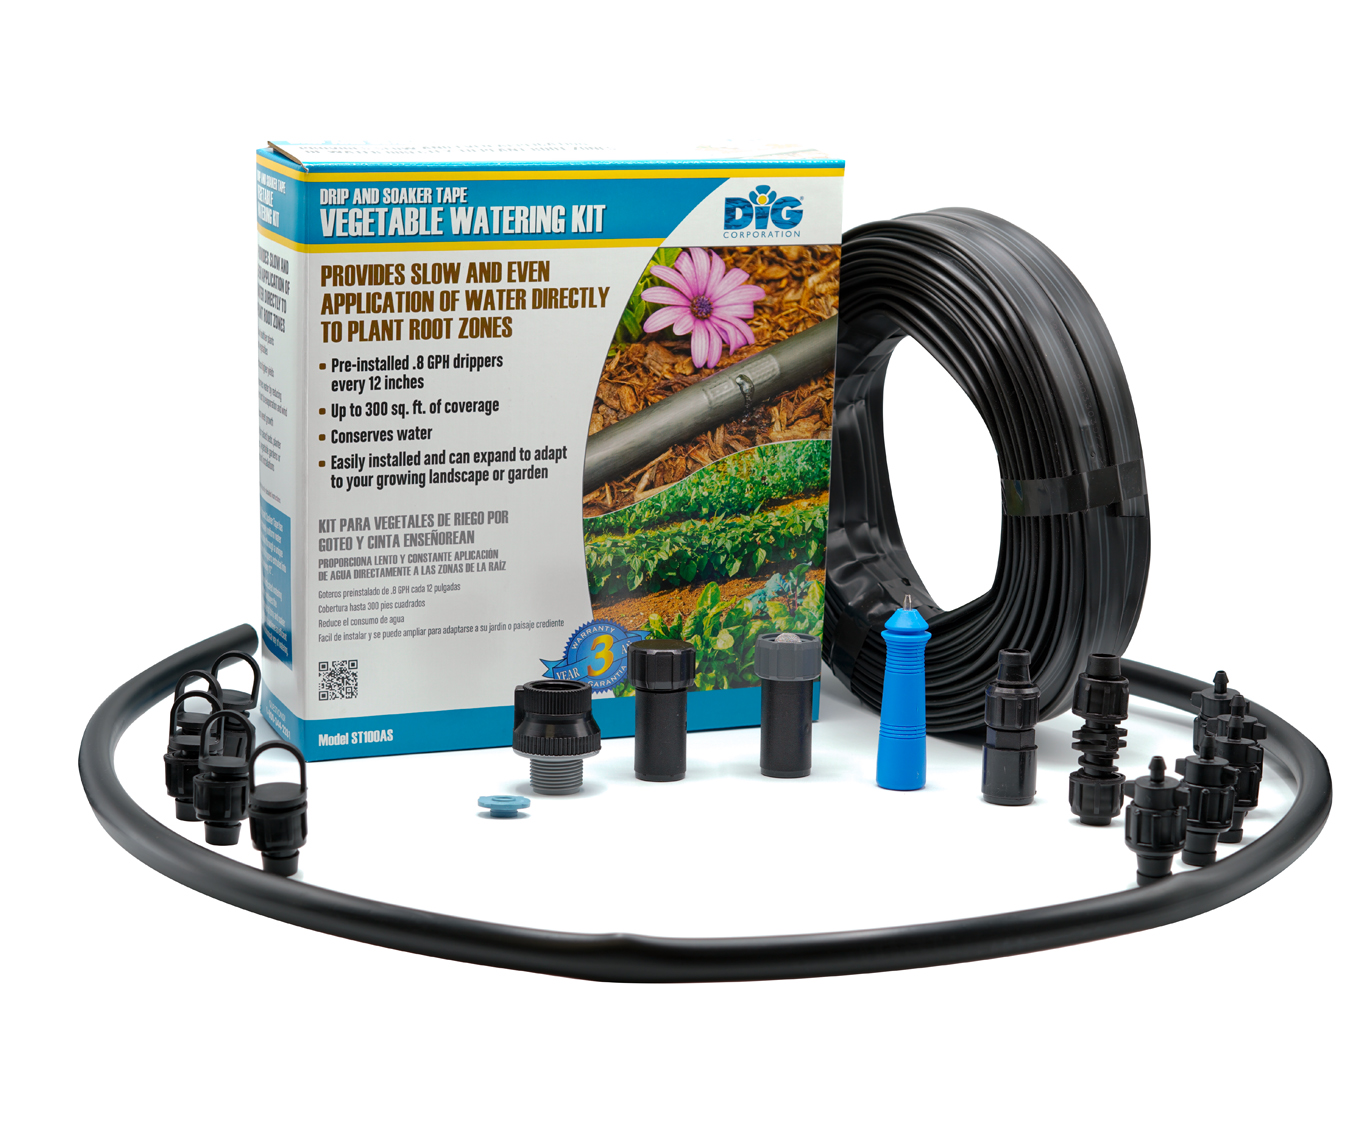
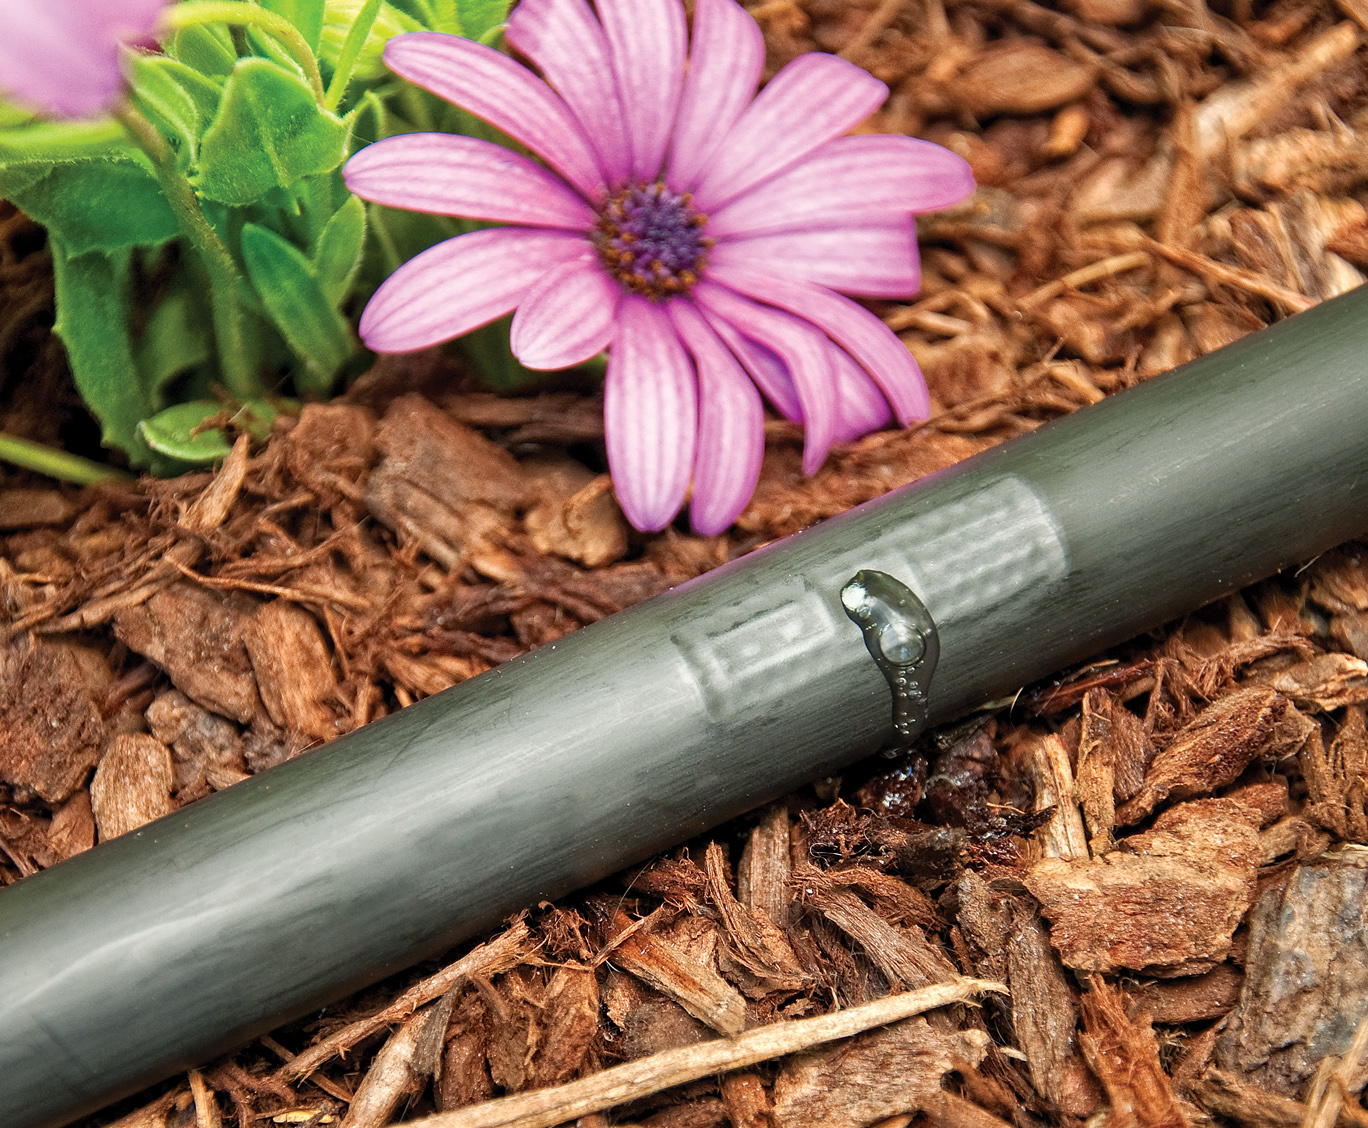
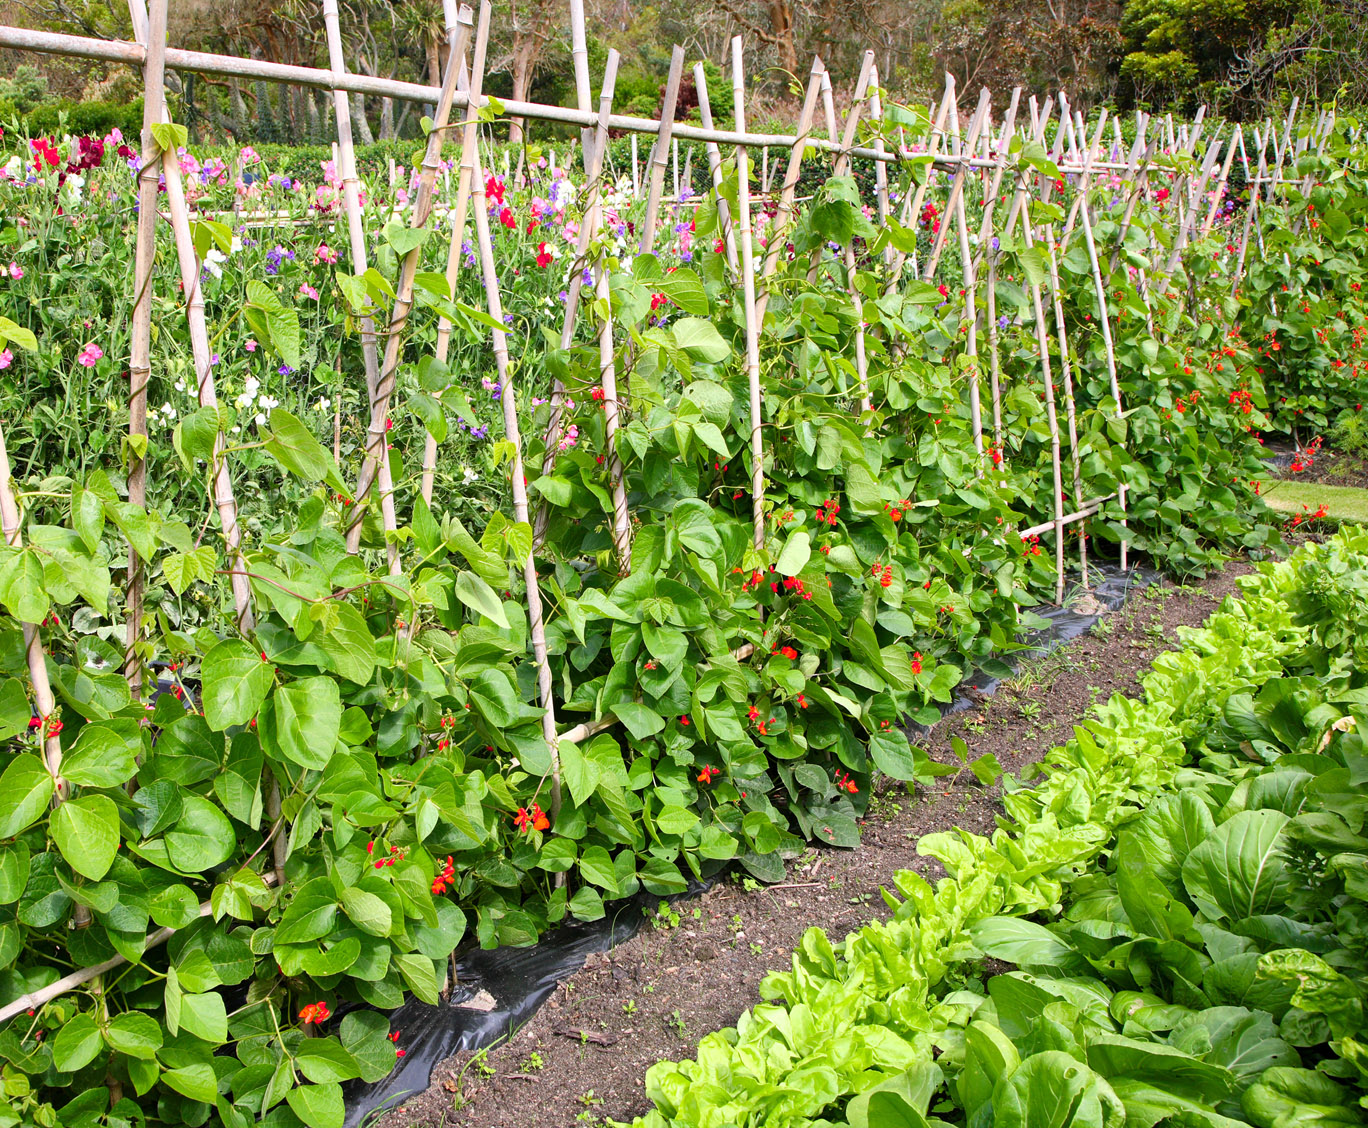
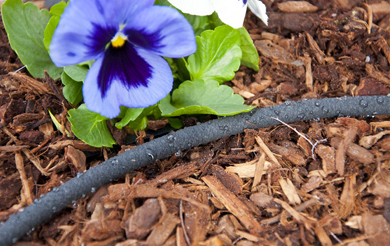
DIG ST100AS Drip & Soaker Tape Vegetable Watering Kit is ideal for use on rows of fruits or vegetables such as beans, lettuce, strawberries, cucumbers, melons, tomatoes peppers, eggplants and many more. The kit’s watering tape is a flat, thin-walled tape containing pre-spaced .5 gallon per hour (GPH) @ 25 PSI In-line drip emitters welded into the drip soaker tape every 12”. The tape expands when filled with water and allows for complete saturation coverage along the line. The kit includes a 3/4” backflow preventer, flow control, 3/4” swivel adapter, 5’ of our premium 1/2” drip tubing with .600 ID x .700 OD, 100′ of drip tape with pre-inserted drip emitters every 12”, five connectors to start five rows, five end connectors and all other parts needed to complete or extend the system.
The drip soaker tape requires special fittings, available in a number of configurations, for exclusive use with the drip soaker tape.
Features:
- Simple to install
- Ideal for use on rows of vegetables and fruits, such as blueberries, strawberries, cucumbers, melons, boysenberries, raspberries and many more
- High-quality-extruded thin-wall pipe profile with pre-inserted drip emitters every 12”
- Can operate under extreme weather and field conditions
- Applies water to the plant roots at a low application rate leading to less surface evaporation from leaves and soil
- Offers flexibility in watering frequency and application rate, minimizing surface compacting and runoff
- The drip emitters’ turbulent flow path design with larger internal water passage offers higher resistance to clogging
- No special tools or glue are needed
- Saves money by significantly lowering the cost of system
- DIG’s drip irrigation products may be exempt from residential and commercial watering restrictions (check local codes)
- Provides ease of watering with lower water use and less water waste
- FREE BONUS BOOKLET! “How to Plan a Vegetable Garden”
How to Order
| MODEL | DESCRIPTION |
|---|---|
| ST100AS | Drip & Soaker Tape Drip Irrigation Vegetable Watering Kit |
Specifications
- Drip tape drip emitters flow rate: .4 gallons per hour (GPH) @ 15 PSI, .47 gallons per hour (GPH) @ 20 PSI and .5 gallons per hour (GPH) @ 25 PSI
- Total flow rate for this kit: 50 GPH (.83 GPM) @ 25 PSI
- Operating pressure: 10 to 25 PSI (pressure regulator not included)
- Maximum recommended flow rate @ 25 PSI: 220 GPH (3.6 GPM)
- Drip tape length: 100’ of 15 mil with .634 ID x .664 OD
- Drip tubing length: 5’ of 1/2” with .600 ID x .700 OD
- Drip emitters spacing: 12"
- Maximum length of layout per row: 280'
Box Contents
| qty | description |
|---|---|
| 1 | 3/4" FHT x MPT (gray) backflow preventer |
| 1 | 3/4" FPT (gray) swivel adapter with screen |
| 1 | flow control |
| 1 | 5' of 1/2" poly tubing feeder line |
| 1 | 100' of drip & soaker tape |
| 5 | drip & soaker tape ends |
| 5 | drip & soaker tape reducer |
| 1 | compression x soaker tape coupling |
| 1 | 3/4" compression end cap for 1/2" poly tubing |
| 1 | hole punch |
| 1 | installation instructions |
Manuals
 English
 About
The ST100AS Drip & Soaker Vegetable Watering Irrigation Kit can be used in vegetable gardens and row plantings. The kit has 100′ of drip tape with pre-inserted drip emitters every 12” for even uniformity along the length of the line. The drip tape is ideal for use on crops grown in rows such as blueberries, strawberries, cucumbers, melons, boysenberries, raspberries and many others.
This kit can be started from a 3/4” garden hose or faucet/spigot. If intending to expand the system, we highly recommend installing a 25 PSI pressure regulator (not included) after the backflow preventer and removing the flow control. The pressure regulator is used to lower the incoming pressure of the system to the suggested operating pressure of 25 PSI, which is within the range of recommended pressures for a drip irrigation or micro sprinkler system. The instruction manual for this kit can be found in the kit package. After the growing season is over, the drip tape can be removed for storage until the next crop or season, or it can be recycled or disposed of.
To use drip irrigation in vegetable gardens, it is best to water early in the morning before the temperature begins to rise, allowing excess moisture on leaves and top soil to dry before fungal and other diseases can develop. The most common cause of early plant death is over watering. Using drip irrigation can help sustain healthy plants by applying water directly to the plant root zone when and where it is needed. For established pot plantings, short watering times are recommended.
We provide the following installation steps as general suggestions; there are other ways to install this kit.
Start the kit from a faucet or garden hose
- First review the area to be irrigated and then make a drawing of the garden or site with your preferred layout. Keep a record of this information for future expansion or scheduled maintenance.
- To automate the system, install one of DIG’s hose end timers (not included) after the backflow device.
- In the installation stage, first connect the backflow device to the faucet. Then, insert the flow control device to the swivel adapter. The flow control allows consistent flow regardless of pressure. Then, connect the 3/4” swivel adapter with a screen and flow control to the backflow device. If a pressure regulator (model D46, not included in this kit) is used, remove the flow control device. If water quality is a concern, we highly recommend using a fine mesh 3/4” filter with 155 mesh (model D57A), not included with this kit.
- Connect the 1/2″ drip tubing to the 3/4” swivel adapter with flow control. To connect the 1/2″ drip tubing into the fitting’s compression side, cut the drip tubing with a hand pruner, being careful to keep dirt from entering the line. Then, hold the fitting in one hand and the 1/2” drip tubing in the other and force the drip tubing into the fitting by wiggling it from side to side. Make sure that the drip tubing is pushed into the fitting for about 1/2″ to 5/8″ for a very tight fit. No glue or clamps are required.
- At this stage of the installation you have two layout options:
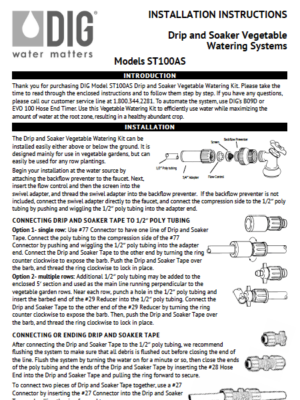
Option one with single row: Use the drip tape to 1/2” drip tubing connector to connect the drip tape to the end of the drip tubing for a single line of drip tape. This one line can be extended up to 280’ long.
a. First, connect the 1/2” drip tubing to the compression side of the connector by pushing and wiggling the 1/2” drip tubing into the adapter end. Connect the drip soaker tape to the other end by first turning the ring counter-clockwise to expose the barb, then pushing the drip soaker tape over the barb, and finally threading the ring clockwise to lock in place.
b. Lay out the 100’ drip soaker tape near the row of vegetables or between two close rows (6”-10” apart). Extend the drip tape a few extra feet past the end of the row.
Option two with multi-rows: Additional 1/2” drip tubing may be added to the 5’ section in this kit and used as the main line.
a. Lay out the drip tubing perpendicular to the vegetable garden rows.
b. Near each row, punch a hole in the 1/2” drip tubing using the tool punch included in this kit and insert the barbed end of the drip soaker tape reducer (model ST13B) into the 1/2” poly tubing.
c. Connect the drip soaker tape to the other end of the drip soaker tape reducer by turning the ring counterclockwise to expose the barb, then push the end of the soaker tape over the barb, and thread the ring clockwise to lock in place.
d. Lay out the 100’ of drip tape near the row of vegetables or between two close rows (6”-10” apart). Extend the drip tape a few extra feet past the row.
- Turn the water on to flush all outlets for about 30 seconds to a minute and after the lines are flushed turn the water off.
- Close each drip soaker tape end using the end closer.
- Turn the water on again to test the system for leaks.
- If a hose end timer is used, program the timer depending on the type of soil you have. (See “About the soil”, below.)
Note: To expand the kit we highly recommend continuing with the same model drip soaker tape. Review the instruction manual included with the kit for complete details.
About the soil and suggested watering frequency:
- Sandy soil or light textured soil: Water percolates straight through before it can spread far enough horizontally. Apply water at close intervals such as every other day for 20 to 90 minutes depending on plant size and type, daylight conditions (full sun, partial sun or shaded) and weather pattern (cold to hot) with the plants under full sun in hot conditions getting the longer period.
- Loamy soil or medium textured soil: This is the ideal soil condition with water moving slowly and spreading evenly. Apply water at wider intervals such as every two to four days for 15 to 90 minutes depending on plant size, type, daylight conditions (full sun, partial sun or shaded) and weather pattern (cold to hot) with the plants under full sun in hot conditions getting the longer period.
- Clay soil or heavy textured soil: Water is absorbed very slowly. Apply water at longer intervals such as every three to five days for 30 minutes to 60 minutes depending on flow rate, plant size and type, daylight conditions (full sun, partial sun or shaded) and weather pattern (cold to hot) with the plants under full sun in hot condition getting the longer period.