R67 Adapts Micro Tubing Barb to 1/2″ Riser
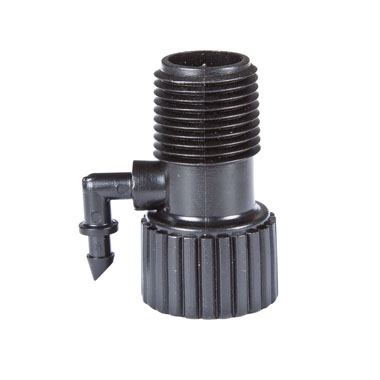
The R67 1/2″ FNPT x 1/2″ MNPT Riser Adapter with a 1/4″ barbed side elbow outlet allows incorporation of 1/4″ micro tubing with drip fittings into an existing 1/2″ sprinkler riser, while still allowing full use of the sprinkler head. It allows a combination of drip emitters or other low-flow devices to be installed to the riser below the sprinkler, offering an easy alternative for watering baskets, containers and individual plants that were not covered by the original sprinkler head.
Features
- Provides a barbed outlet when mounted to any 1/2″ riser
- Simple option to retrofit a sprinkler riser to a drip irrigation system
- Constructed of UV-resistant, durable plastic material to withstand the most adverse conditions
How to Order
| MODEL | DESCRIPTION |
|---|---|
| R67 | Adapts Micro Tubing Barb to 1/2 in. Riser |
Specifications
- Operating pressure: 10 to 60 PSI
- Inlet size: 1/2" female pipe thread (FNPT)
- Outlet size: 1/2" male pipe thread (MNPT)
- Side outlet: 1/4" barbed elbow for use with 1/4" micro tubing (.140 to .170 ID)
- Materials: High-impact plastic
About
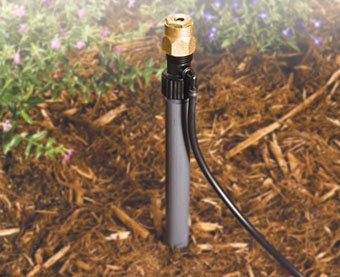
DIG’s 1/2″ FNPT x 1/2″ MNPT Riser Adapter allows the addition of 1/4″ drip tubing to a sprinkler riser so that a sprinkler head and drip irrigation can be combined from the same riser. This adapter is designed to incorporate a drip outlet onto an existing sprinkler system by converting one or more 1/2″ risers to drip irrigation without disturbing the flow of the other sprinklers on the line. The adapter can be used with many options, using drip emitters, foggers, sprayers or spray jets to water shrubs, baskets, containers, window boxes and individual potted plants that are not covered by the existing sprinkler head.
Installation suggestions
- Remove the sprinkler head from the riser.
- Turn the water on to flush the system. Next. shut off the water and thread the 1/2″ adapter with the 1/4″ barbed elbow onto the riser and then thread back the sprinkler head.
- To the adapter’s 1/4″ barbed elbow outlet, connect 1/4″ micro tubing (models B38 for 50′ and B38100 for 100′) and lay it out to the baskets, containers, window boxes or individual potted plants to be watered. At this point you have a number of options:
a. To the end of the micro tubing, add an adjustable or preset drip emitter and secure the end of the micro tubing with a stake (model P35B, pack of 10).
b. To the end of the micro tubing, insert a 1/4″ barb (model H80A, pack of 5) and connect 1/4″ drip line (model SH50, 50′ with .5 GPH drip emitters every 12″) or soaker hose (model PSH50) and loop it around the plant or pot. This option will provide a larger wetted area under the plant canopy or inside the potted plant.
c. To the end of the micro tubing, insert a 1/4″ tee (model H82A, pack of 5). From the tee, extend additional lengths of micro tubing with 4-GPH PC or adjustable drip emitters (models B224B, pack of 10, or B10B, pack of 10) to each plant, placing the drip emitter under the plant canopy, at the center between the plant trunk and the pot edge. - Turn the water on and check the system, making sure that the sprinkler head and all drip outlets are working and that the location of each outlet meets your needs.