Small & Large Pots
DIG’s planter’s two-sized pots are used in the installation of DIG’s Living Wall Modular Vertical Garden. They are designed to be potted at a bench, at a good working height and then mounted onto the modular wall mounting brackets as part of your vertical garden.
Features
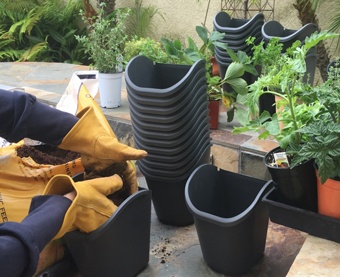
- The Living Wall™ vertical garden planter’s pots can be removed from the panel. This means that the potting is done at a bench, at a good working height. The plants can even be established on the ground before being positioned and mounted onto the modular wall mounting brackets.
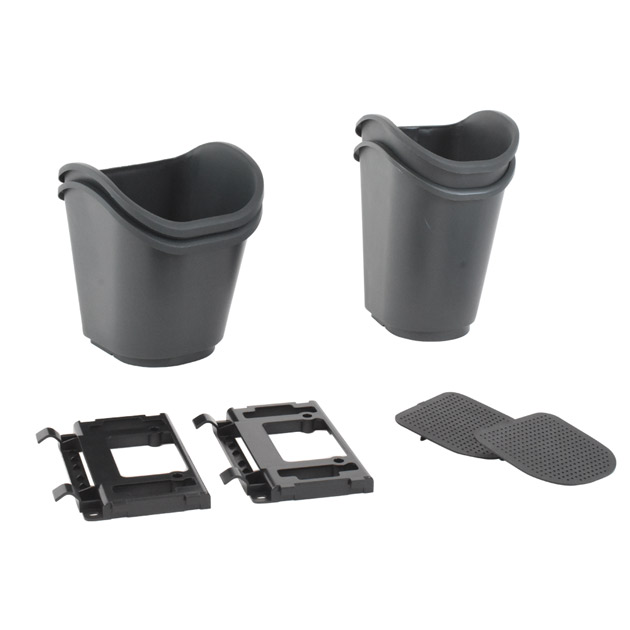
- The planter’s pots are designed with meshed screen plate with two internal supporting legs faced downward that provide root protection, providing a safe growing medium.
- The Living Wall™ vertical garden is a low maintenance system that has open layers between the pots and the wall, providing protection from moisture and preventing discoloration of the exposed wall.
- Offers the ability to add, remove, re-plant and re-hang the pots quickly and easily
- Potting can be completed at a bench at a good working height before mounting
- Once the pots have been mounted to the panels, if something goes wrong, it’s easy to remove a single pot and fix the problem and even replant and then pop it back into its original position.
- The pots are made with a raised drain hole at the bottom for better water holding capability that may allow for less frequent
How to Order
| MODEL | DESCRIPTION |
|---|---|
| 70-009S | Small Pot w/ Bottom Plastic Mesh Plate 4 3/4” (12 cm) Width x 5 1/2” (14 cm) Depth x 6 1/2” (16 cm) Height - Dark Green |
| 70-010L | Large Pot w/ Bottom Plastic Mesh Plate 6 7/8” (17 cm) Width x 6 7/8” (17 cm) Depth x 6 1/2” (16 cm) Height - Dark Green |
| GLW-209S | Two Small Pots w/ Bottom Plastic Mesh Plates & Mounting Brackets 4 3/4” (12 cm) Width x 5 1/2” (14 cm) Depth x 6 1/2” (16 cm) Height - Dark Green |
| GLW-409S | Four Small Pots w/ Bottom Plastic Mesh Plates & Mounting Brackets 4 3/4” (12 cm) Width x 5 1/2” (14 cm) Depth x 6 1/2” (16 cm) Height - Dark Green |
| GLW-210L | Two Large Pots w/ Bottom Plastic Mesh Plates & Mounting Brackets 6 7/8” (17 cm) Width x 6 7/8” (17 cm) Depth x 6 1/2” (16 cm) Height - Dark Green |
| GLW-410L | Four Large Pots w/ Bottom Plastic Mesh Plates & Mounting Brackets 6 7/8” (17 cm) Width x 6 7/8” (17 cm) Depth x 6 1/2” (16 cm) Height - Dark Green |
Specifications
- Small pot size: 4 3/4" (12.1 cm) width x 5 1/2" (14 cm) depth x 6 1/2" (16 cm) height
- Large pot size: 6 7/8" (17.5 cm) width x 6 7/8" (17.5 cm) depth x 6 1/2" (16.5 cm) height
- Pot color: Dark green
- Pot weights:
- Small pot: .367 lbs. (.166 kg)
- Large pot: .592 lbs. (.269 kg)
Cut Sheets
 English
 Pots Planting and mounting
One of the main features of DIG’s Living Wall™ vertical garden is that the pots can be removed from the mounting brackets. This means that the potting can be completed at a bench, at a good working height. The plants can even be established on the ground before mounting onto wall mounting brackets. Once the pots have been mounted to the panels, if something goes wrong, it’s easy to remove a single pot and solve the problem and even replant and then pop it back into its original position.
- Position the meshed screen plate inside the pot with the two supporting legs faced down.
- Plant the pot using the right potting mix for the plants used.
- Mount the pots onto the wall mounting brackets. Each pot has a flat hook at the rear that slides into the center slot on the mounting brackets. The slot is wider than the flat hook and this allows some movement when positioning the pots.
- Once the pot is mounted and in position, insert a micro stake into the pot and position the micro stake near the center of the pot. Anchor the micro stake, which can be pushed into the potting mix, so it doesn’t get blown or sprung out of position.
- If you are growing a selection of plants, please be aware that the top row is best for taller growing plants as their natural vertical habit of growth is upward. For the second row of panels with pots, it’s better to choose plants with a flat or even trailing growth habit so these can get access to sunlight.
- Once all the pots are in place and the drip system is connected, turn the water on and check if the system is working well. If it is leaking somewhere, investigate the issue and fix it. Pressure-test the system to identify leaks in the laterals and fittings, and then program the hose end timer, if used.
- Water the plants as regularly as required. As a rule, the surface of the soil should dry out between each watering. Watering requirements will vary as determined by location, weather, plant type and soil type. Use a hose end timer to regulate how much water is applied to the plants.
- It is a simple to add extra pots. Once you have the mounting brackets pots installed, use the same method to add additional wall mounting brackets and pots. Use the same method to expand the irrigation system.