Mini Sprinkler on Spike
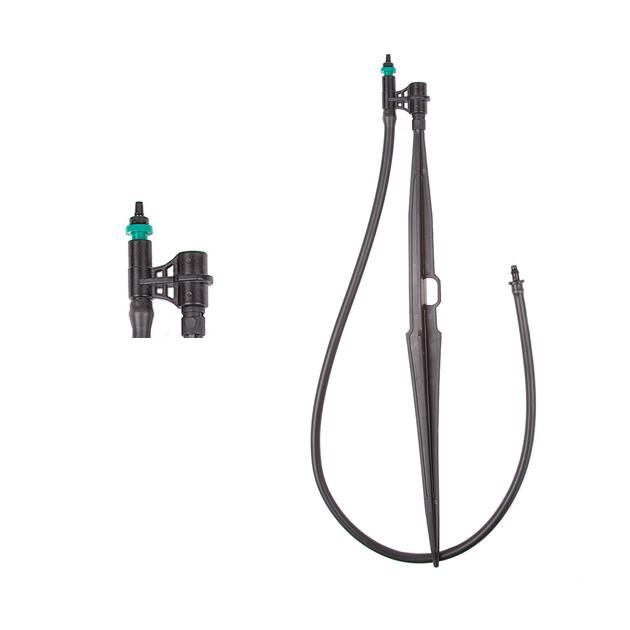
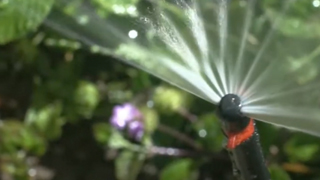
DIG’s completely assembled dynamic Mini Sprinkler on Spike features low flow, low trajectory and high uniformity, suitable for home garden and horticultural irrigation. Each mini sprinkler unit is completely assembled with a 13” stake, 24” micro tubing and a 1/4” barb for easy installation under tree canopies using one per tree, and for seedlings, flowerbeds and groundcovers. The 360° mini sprinkler is available in two models: Model 8809-1, with a blue nozzle, covers up to 10.7’ full circle with flow rates of up to 11.3 GPH and model 8824-1, with a green nozzle, covers a full circle with a wetting diameter of up to 16.1′ with flow rates of 25.6 GPH.
Features
- Recommended for under tree canopies, and for seedlings, flowerbeds and groundcovers
- Full-circle pattern facilitates excellent water distribution
- Large droplets, suitable for irrigation in windy areas
- Insect proof; the mini sprinkler closes after operation, preventing dirt and insects from entering the sprinkler housing
- Low flow rate
- Easy to dismantle, clean and assemble
- Press-fit configuration for easy maintenance
- No misting
- Reliable operation with low maintenance and trouble-free operation, even at low pressure
- Strong propulsion of the spinner at low pressure for even uniformity
- Frame construction without a bridge gives a complete 360° circle
- Can be used upside down to reduce wetting diameter
- The unit includes 24” .160 ID x .270 OD micro tubing, a 13” stake and 1/4″ barb
- Made of high-impact, high-strength, UV-resistant plastic for durability and long life
How to Order
| MODEL | DESCRIPTION | COLOR |
|---|---|---|
| 8809-1B | 360° Mini-Sprinkler on Spike, Complete Assembly (pack of 1) |
Blue |
| 8824-1B | 360° Mini-Sprinkler on Spike, Complete Assembly (pack of 1) |
Green |
Specifications
- Operating pressure range: 25 to 35 PSI
- Recommended operating pressure: 25 PSI (use with model D46 25-PSI pressure regulator)
- Flow rate: model 8809-1B with 9.6 GPH and model 8824-1B with 21.6 GPH @ 25 PSI
- Diameter of coverage @ 25 PSI: model 8809-1B with up to 7.8' and model 8824-1B with up to 13.8'
- Pattern: 360°
- Color code: model 8809-1B with a light blue nozzle, and model 8824-1B with a green nozzle
- Product locator number: 94 for model 8809-1B and 95 for 8824-1B Recommended micro sprinkler spacing: 4' to 8' apart
- Micro tubing length & size: 24" x 1/4" with .160 ID x .270 OD
- Filter requirement: minimum of 150 mesh
- Material:
- Stake: polypropylene
- Mini sprinkler: high-impact plastic
Model 8809-1B flow rate, and diameter
| Pressure | Mini sprinkler | Flow rate | diameter |
|---|---|---|---|
| PSI | orifice | GPH | 360° |
| 25 | Light blue .035" | 9.6 | 7.8' |
| 30 | Light blue .035" | 10.5 | 9.8' |
| 35 | Light blue .035" | 11.3 | 10.7' |
Model 8824-1B flow rate, and diameter
| Pressure | Mini sprinkler | Flow rate | diameter |
|---|---|---|---|
| PSI | orifice | GPH | 360° |
| 25 | green .051" | 21.6 | 13.8' |
| 30 | green .051" | 23.7 | 15.2' |
| 35 | green .051" | 25.6 | 16.1' |
Maximum number of mini sprinklers on 1/2" drip tubing with .600 ID @ 25 PSI
| Mini sprinkler model 8809-1B spacing | 4' | 5' | 6' | 7' | 8' |
|---|---|---|---|---|---|
| Flow rate @ 25 PSI | 9.6 | 9.6 | 9.6 | 9.6 | 9.6 |
| Maximum length | 88' | 100' | 114' | 126' | 136' |
| Flow rate in GPM | 3.52 | 3.20 | 3.04 | 2.88 | 2.72 |
| Flow rate in GPH | 211.2 | 192 | 182.4 | 172.8 | 163.2 |
| # of mini sprinklers | 22 | 20 | 19 | 18 | 17 |
| Head loss in PSI | 5.3 | 5.0 | 5.2 | 5.2 | 5.0 |
| Velocity (f/s) | 4.0 | 3.63 | 3.45 | 3.27 | 3.09 |
| 24" micro tubing head loss in PSI | 0.6 | 0.6 | 0.6 | 0.6 | 0.6 |
| Total head loss at the spray head | 5.9 | 5.6 | 5.8 | 5.8 | 5.6 |
| Mini sprinkler model 8824-1B spacing | 6' | 7' | 8' | 7' | 9' |
|---|---|---|---|---|---|
| Flow rate @ 25 PSI | 21.6 | 21.6 | 21.6 | 21.6 | 21.6 |
| Maximum length | 66' | 70' | 80' | 90' | 90' |
| Flow rate in GPM | 3.96 | 3.60 | 3.60 | 3.60 | 3.24 |
| Flow rate in GPH | 237.6 | 216 | 216 | 216 | 194.4 |
| # of mini sprinklers | 11 | 10 | 10 | 10 | 9 |
| Head loss in PSI | 4.9 | 4.4 | 5.0 | 5.6 | 4.6 |
| Velocity (f/s) | 4.5 | 4.09 | 4.09 | 4.09 | 3.68 |
| 24" micro tubing head loss in PSI | 0.6 | 0.6 | 0.6 | 0.6 | 0.6 |
| Total head loss at the spray head | 5.5 | 5.0 | 5.6 | 6.2 | 5.2` |
Videos
-
Demonstration Connecting a Micro Sprayer to .700 Poly Tubing
-

Being Water Wise, presented by Stuart M. Spaulding
About
DIG’s dynamic mini sprinklers’ mechanism is constructed of a plastic needle located inside the mini sprinkler housing that vibrates when in operation and disperses small droplets evenly over the soil profile. The ideal spacing for full coverage is 4’ to 8’ between the mini sprinklers and 5′ to 8’ between the laterals to a maximum distance of 130’ in length using 1/2” drip tubing with .600 ID as the main lateral. Mini-sprinkler or micro-sprinkler irrigation systems operate with low flow at relatively low pressure compared to conventional sprinkler systems. Low-flow overhead with low-application-rate irrigation can be used for areas where drip emitters are not practical, for keeping plant foliage constantly moist or when overhead watering is required. Mini-sprinkler or micro-sprinkler irrigation applies water to the surface area in a very light precipitation rate and in a low tension to the soil, allowing the water to dissipate in a wetted profile that provides high uniformly. One of the main features of the mini sprinklers or micro sprinklers is that they can prevent plant stress by maintaining low water tension in the soil, using a low flow application rate.
Installation
The micro irrigation systems consist of a system “head” and distribution laterals. The system head assembly consists of backflow device, filter, fertilizer injector (optional) and pressure regulator. Generally, the head assembly parts can be found in any store that carries drip irrigation components. The fertilizer applicator and AC or DC controllers are optional equipment but highly desirable because they can help by adding flexibility to the system. The distribution laterals consists of main line pipes, usually made of PVC, the sub lateral pipe, made of polyethylene (PE), fittings and accessories. The system automation can be actuated electrically by an AC controller connected to an AC solenoid valve or by a hose end timer or battery operated controller.
Installation suggestions
Basic installation recommendations for this product include first reviewing the area and then making a drawing of the garden or site with your preferred layout.
If automation is required, use one of DIG’s hose end timers or battery operated controllers. The ideal controller should have flexible scheduling and two to four start times per day for added flexibility.
Start the installation from a PVC pipe or to pipe thread
- If the drip system installation is started from a PVC pipe, first shut off the main water supply.
- If an automated system is preferred, we recommend installing a 3/4” ball valve or gate valve before the battery operated controller or AC valve, if used. This ball valve can be very useful as an emergency backup to turn the system off. This type of arrangement is used by professional installers.
- Turn the water supply on to flush the line and then shut the water supply off using the new ball or gate valve.
- Install an AC valve or battery operated controller, wrapping TEFLON tape on all the male thread fittings used.
- Turn the water supply on again to pressurize the system. The unit will open momentarily and then will shut off.
- Test the valve or the battery operated controller and make sure that it is working correctly. If using a battery operated controller, program it.
- After the AC valve or battery operated controller, add a 3/4” screen filter with 155-mesh (model D55). The screen filter is used to protect the drip system. Then, add a preset 25 PSI pressure regulator (model D46P) or adjustable pressure regulator (model PRV075). The pressure regulator is used to lower the pressure to the suggested operating pressure for a drip system. Follow with a 3/4” swivel adapter (model 50001) to the drip tubing or 3/4” PVC thread x slip adapter to the PVC line.
Start the installation from a faucet or hose thread
- If an automated system is preferred, install a hose end timer.
- Test the hose end timer and make sure that it is working correctly, then program it. To the hose end timer, add a backflow device (model D45), then a 25 PSI pressure regulator (model D46) and follow with a 3/4″ swivel adapter with screen (model C34). If water quality is a concern, we highly recommend using a fine mesh 3/4″ filter with 155-mesh (model D57A).