GE200 Drip & Micro Sprinkler Kit
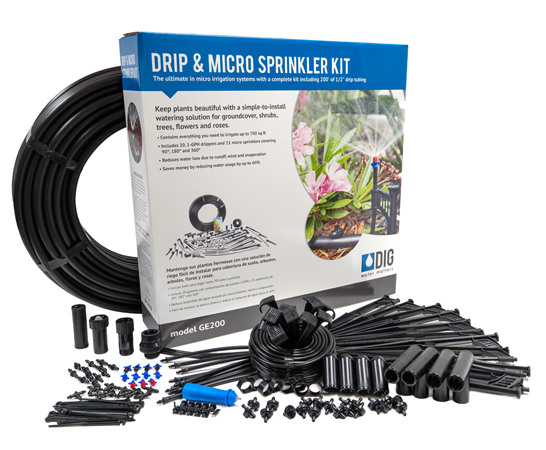

The GE200 Drip & Micro Sprinkler Kit is one of DIG’s bestselling drip irrigation kits, suitable for residential gardens planted with roses, shrubs, groundcovers, flowerbeds and trees. The kit can cover up to 700 sq. ft and can be expanded to cover more than 1000 sq. ft using additional drip tubing, micro sprayers and drip emitters. This kit contains all the parts needed to start a drip irrigation system from a faucet or a garden hose. The kit includes a 3/4″ backflow preventer, 3/4″ 25 PSI pressure regulator, 3/4″ swivel adapter, 200′ of premium 1/2″ drip tubing with .600 ID x .700 OD, 50′ of 1/4″ micro tubing, 11 micro sprayer assemblies with 13″ stakes and micro tubing with barbs, 20 1-GPH PC drip emitters and all the necessary parts needed to complete the installation.
Features
- Use to water roses, shrubs, groundcovers, flowerbeds and trees; ideal for hillsides
- Complete kit; covers up to 700 sq ft (can be easily expanded)
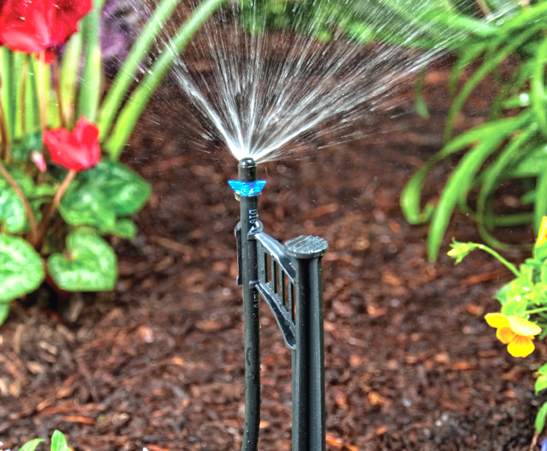
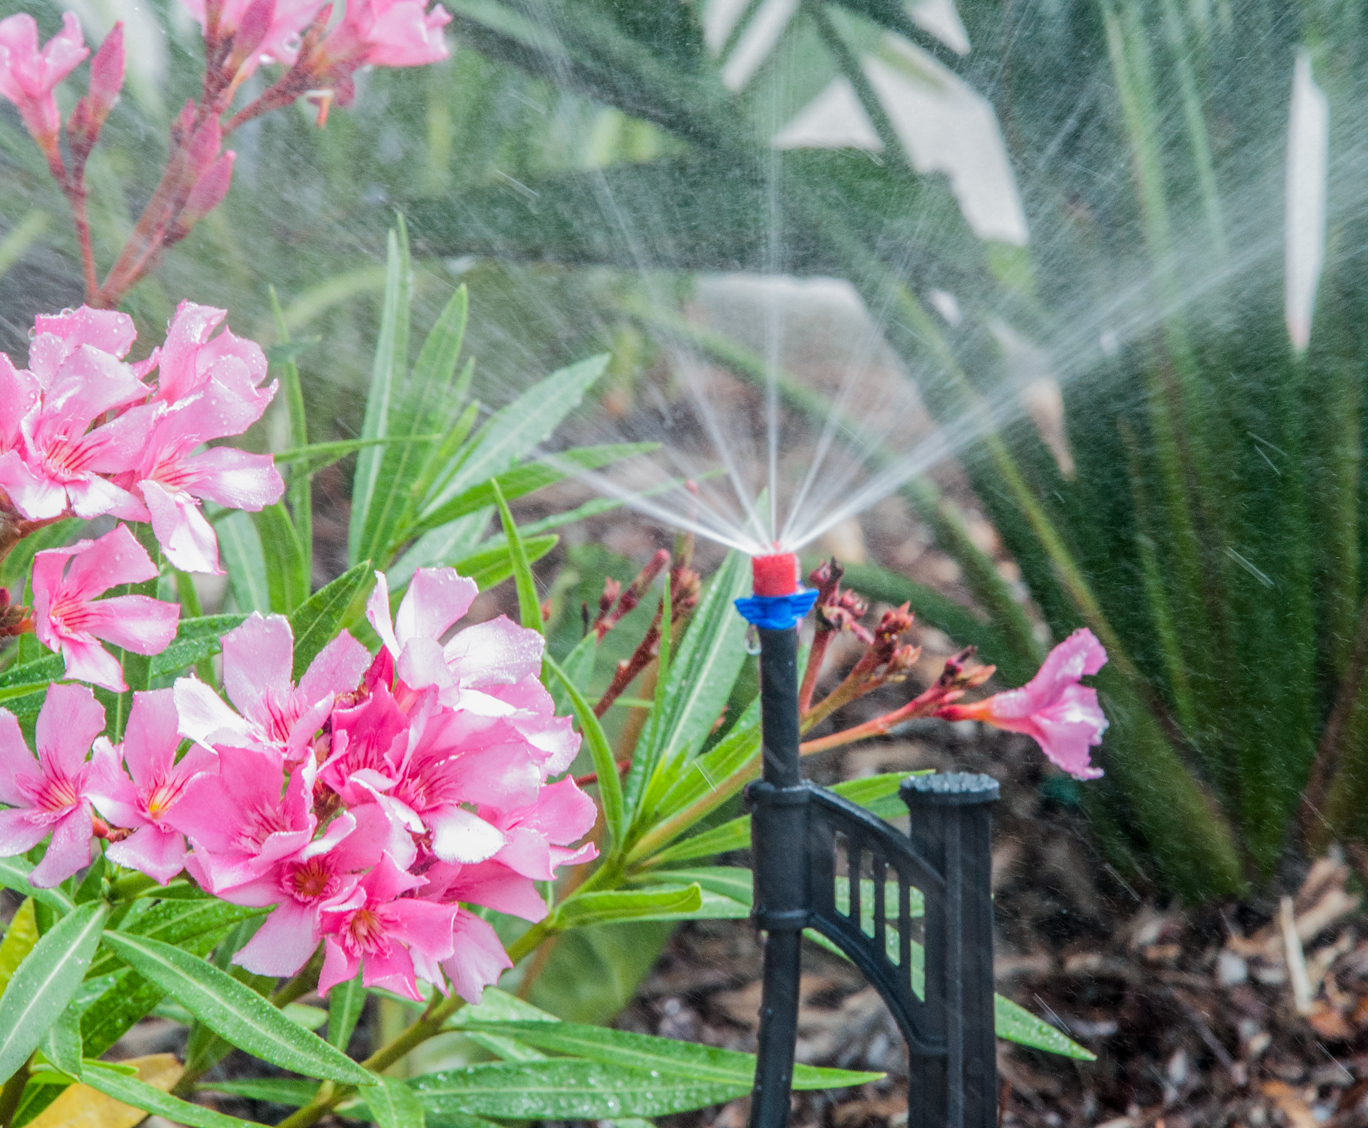
- Contains 11 micro sprayer assemblies, including three 360°, four 180° and four 90° patterns, and 20 1-GPH PC button drip emitters
- Applies water at a very low application rate reducing surface evaporation from leaves and soil
- Micro sprayers are useful as water remains in the upper soil layers where the roots are developing
- Easy to install
- Provides flexibility in irrigation frequency and low application rate minimizes soil compaction and surface runoff
- Designed for new and existing landscapes, including difficult terrain such as slopes and oddly shaped areas
- No special tools or glue are needed
- Save money by significantly lowering the cost of system components compared to conventional irrigation systems
- DIG’s drip irrigation products may be exempt from residential and commercial watering restrictions (check with local water provider)
How to Order
| MODEL | DESCRIPTION |
|---|---|
| GE200 | Ultimate Drip Irrigation & Micro Sprinkler Kit |
Specifications
- Maximum incoming pressure: 100 PSI
- Operating pressure: 25 to 30 PSI (25 PSI preset pressure regulator included)
- Maximum recommended flow rate: 220 GPH (3.7 GPM)
- Poly tubing length & size: 200' x 1/2" with .600 ID x .700 OD
- Micro tubing Length and size: 50' x 1/4"
- 3/4" FHT x MHT pressure regulator: downstream pressure preset to 25 PSI
- PC drip emitter flow rate: 1 gallon per hour (GPH)
- Micro sprayer flow rate: 14 gallons per hour (GPH)
- Total flow rate for this kit: 174 GPH (2.9 GPM)
Box Contents
| qty | description |
|---|---|
| 1 | 3/4" FHT x MHT backflow preventer |
| 1 | 3/4" FHT x MHT pressure regulator |
| 1 | swivel adapter with screen |
| 1 | 200' of 1/2" drip tubing |
| 1 | 50' of 1/4" micro tubing |
| 3 | 360° spray jets on threaded barb |
| 4 | 180° spray jets on threaded barb |
| 4 | 90° spray jets on threaded barb |
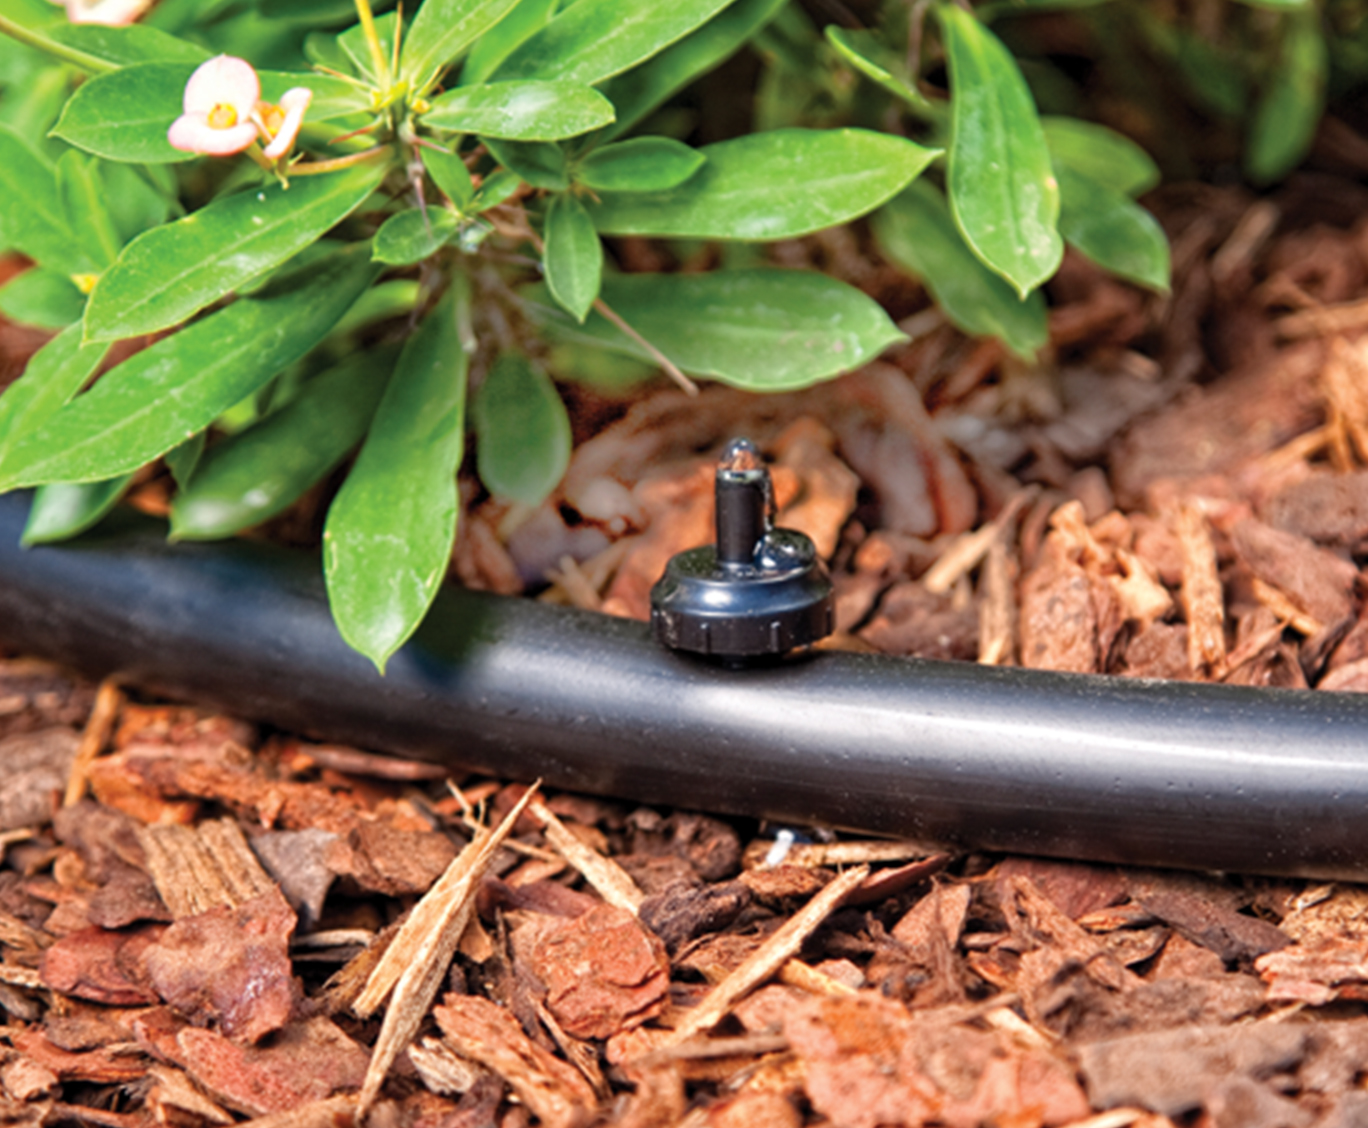
| 20 | 1 gallon per hour (GPH) PC drip emitters |
| 11 | 13" clip spike assemblies with 24" micro tubing and barbs |
| 20 | 1/4" tubing holder stakes |
| 10 | 1/4" barbed tees |
| 12 | 1/4" barb connectors |
| 10 | 1/2" tubing holder stakes |
| 4 | 1/2" tees |
| 1 | 1/2" coupling |
| 4 | 1/2" elbows |
| 1 | hole punch |
| 10 | goof plugs |
| 4 | figure "8" hose ends |
| 1 | Instruction manual |
Manuals
 English
 Cut Sheets

Videos
-
DIG Drip Irrigation System Installation - GE200 Micro Sprayer Kit
-
GE200 Drip & Micro Sprinkler Kit
About the GE200 Drip & Micro Sprayer Kit
The GE200 Deluxe Drip and Micro Sprinkler Kit can be used in a wide range of layouts to accommodate most garden watering requirements. The kit uses micro sprayers with 360°, 180° and 90° spray patterns and PC drip emitters to provide a full flexibility within the installation. The micro sprayers have no moving parts and distribute the water in a very similar manner to conventional spray heads but with very low flow and with very low application rate. The PC drip emitters in the kit can be used to cover additional individual plants within the layout. This kit contains all the parts required to install a complete system for up to 700 SF. It can be connected into a 3/4″ faucet/spigot or a garden hose. If a faucet is not adjacent to the garden or to the location of your drip and micro sprayers irrigation installation, you may extend from the faucet using a garden hose or use additional length of ½” drip tubing (model B35 for 50‘or B36 for 100’). To start the installation, the backflow device can be mounted directly to the faucet or to the end of a garden hose. Please make sure to add the 25 PSI pressure regulator (included) after the backflow preventer. The pressure regulator is used to lower the incoming pressure from the faucet to the recommended operating pressure of 25 PSI, which is within the range of operating pressures for drip irrigation or micro-sprinkler systems.
Installation Steps
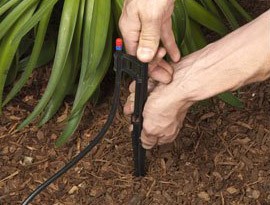
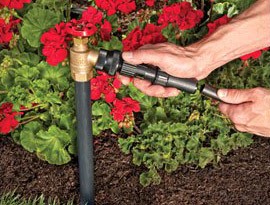 Connect to your water source using the backflow preventer, pressure regulator and swivel tubing adapter.
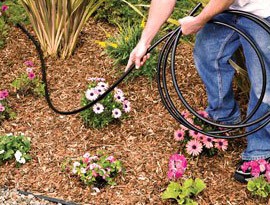 Lay the poly tubing throughout your landscape. Leave the poly tubing out in the sun for a few minutes to make it easier to work with.
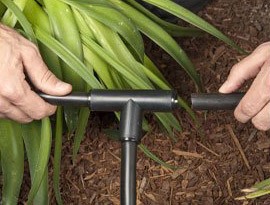 Connect compression elbows and tees as needed.
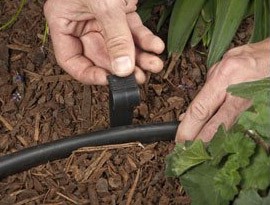 Secure the line using tubing stakes.
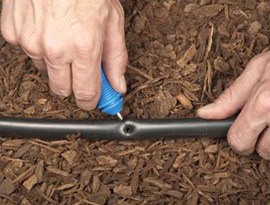 Where you would like to place a drip emitter or extend with micro tubing, punch a hole in the poly tubing using the hole punch.
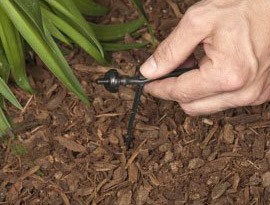
 Insert the drip emitter into the hole or at the end of the micro tubing.
 Secure at the base of the plant using 1/4″ tubing holders.
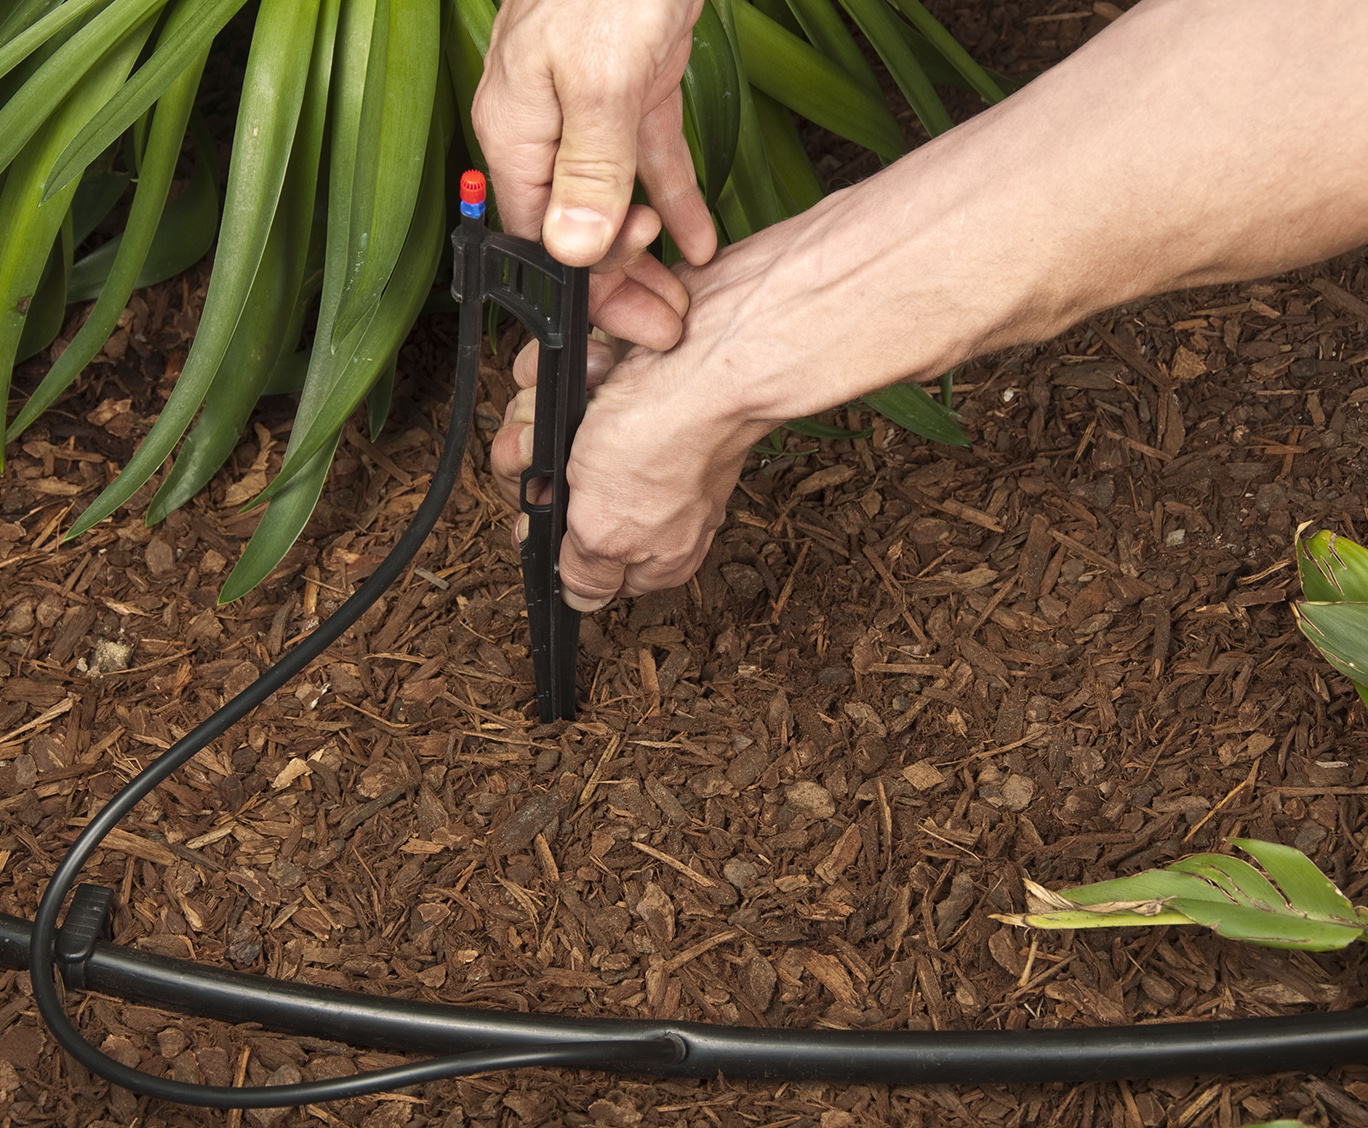
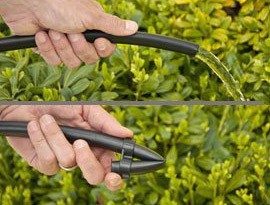
 For micro sprayers, punch a hole in the poly tubing using the hole punch and connect with micro tubing and barb.
 Flush the line and close the end of the poly tubing using a figure “8” hose end.
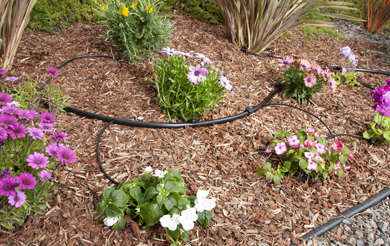
Example layout:

Start the kit from a faucet or garden hose
- The basic installation recommendation for this type of kit is first to review the area and then to make a drawing of the garden or site with your preferred layout.
- In the installation stage, to the faucet, first connect the backflow device, then the pressure regulator and then 3/4″ swivel adapter with screen. If water quality is a concern, we highly recommend using a fine mesh 3/4″ filter with 155 mesh (model D57A), not included with this kit.
- Lay the drip tubing per your drawing and secure the drip tubing to the ground using the stakes provided.
- Add fittings such as elbows and tees per your drawing layout, leaving the end of the drip tubing open.
- Turn the faucet on to flush the line. Then shut off the faucet and close the end of the drip tubing using the hose end included with the kit
- Install the micro sprayers per the recommended spacing suggested in the instruction manual.
- The drip emitters are installed using one of two methods, either directly into the drip tubing or at the end of the micro tubing with the drip emitters placed under the plant canopy, at the center between the plant trunk and the plant canopy edge. One of the most common installation errors is using too few, and poorly spaced, emitters. Often only a single emitter is placed at the base of a newly planted tree or shrub. In clay soils, a single drip emitter can wet three to four feet in diameter; on sandy soils, however, the same layout using the same drip emitter will only wet an area less than one foot in diameter. Because plant roots can grow a few feet a year depending on the plant and locations, after one year the diameter of the root system might exceed the diameter of the watered area. A single emitter per tree or shrub could therefore restrict root development as early as the first year after planting. For this reason, it is especially important to place additional drip emitters around each plant, early in the plant’s life. See soil type section for drip emitter placement.
Note: To expand the kit we highly recommend continuing with the same model micro sprayer and drip emitter components.
Review the instruction manual included with the kit for complete details.
About the soil and suggested drip emitters spacing:
- Sandy soil or light textured soil: Water percolates straight through before it can spread far enough horizontally, so use the drip emitters in close spacing of 10″ to 12″ apart. Apply water at close intervals such as every other day for 20 to 90 minutes depending on plant size and type, daylight conditions (full sun, partial sun or shaded) and weather pattern (cold to hot) with the plants under full sun in hot conditions getting the longer period.
- Loamy soil or medium textured soil: This is the ideal soil condition with water moving slowly and spreading evenly, so use the drip emitters spaced 16″ to 18″ apart. Apply water at wider intervals such as every two to four days for 15 to 90 minutes depending on plant size, type, daylight conditions (full sun, partial sun or shaded) and weather pattern (cold to hot) with the plants under full sun in hot conditions getting the longer period.
- Clay soil or heavy textured soil: Water is absorbed very slowly, so install the drip emitters at a spacing of 18″ to 24″ apart. Apply water at longer intervals such as every three to five days for 30 minutes to 60 minutes depending on flow rate, plant size and type, daylight conditions (full sun, partial sun or shaded) and weather pattern (cold to hot) with the plants under full sun in hot conditions getting the longer period.