This model has been discontinued.
2008i Single Station Battery Operated Controller with 3/4″ Anti-Siphon Valve
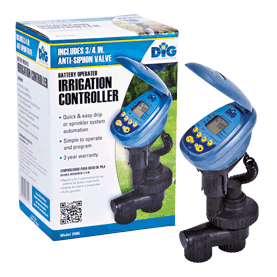
The Single Station Battery Operated Controller with LCD Display and 3/4″ Anti-siphon Valve is recommended for use with drip irrigation or sprinkler systems. An anti-siphon valve is frequently required on outdoor irrigation systems. It is a directional valve that allows water to flow in only one direction and prevents irrigation water from returning back or back siphoning to the drinking water supply line, preventing contamination of the water supply. It is open to the atmosphere when there is reduced or no pressure in the line.
Install the 2008 battery operated controller with anti-siphon valve at least six inches above the highest sprinkler or elevated line within the station.
We recommend using this controller with drip irrigation, sprinkler systems or any other watering application that requires a one way directional valve with more than 1 gallon per minute (GPM) or 60 GPH.
Features
- Use for drip irrigation or sprinkler systems
- Six buttons with large integrated LCD
- Controller run times from 1 minute to 12 hours in 1 minute increments
- The controller can be connected into pipe thread configuration
- more features
- Easy to read LCD display with AM/PM clock and program icons for navigation
- Emergency backup program of 5 minutes every 24 hours if no program is selected after battery installation
- Weather resistant
- Semi-automatic or manual operation
- Manual irrigation cycle can be performed via the controller’s manual program button
- Powered by one 9-volt alkaline battery
- Handy option of irrigation suspension override (rain mode) via the rain mode button
- Low battery indicator
- Meets most city and building codes
- Battery life up to 1 year
- 3 year warranty
How to Order
| MODEL | DESCRIPTION |
|---|---|
| 2008i | Single Station Battery Operated Controller with 3/4 in. Anti-Siphon Valve |
Specifications
- 3/4" anti-siphon valve flow range: Up to 10 GPM
- Operating pressure: 15 to 70 PSI
- Recommended operating pressure: 25 to 70 PSI
- Temperature range: 38-130°F (3-54°C)
- Inlet and outlet: female pipe thread (FNPT)
- Power source: one 9 volt alkaline battery (not included)
- Solenoid: 7-12 VDC, two-way latching, normally closed using two wires
- Install 6 inches above the highest sprinkler or elevated line
Programming options
- Watering duration from 1 minute up to 11 hours and 59 minutes
- Duration can be set in one minute increments
- Watering frequency: can be programmed for an hourly, daily, or weekly schedule
- Weekly schedule the controller can be programmed to operate on any days of the week such as Monday, Wednesday and Friday.
- In In weekly schedule the controller can be programmed with up to four start times.
- In cyclical schedule the controller can be programmed to operate any day such as every one day up to every 30 days, or it can be programmed to operate every 3, 6, and 12 hours. This option is useful for new plantings.
- In cyclical schedule the controller programmed for one start time only.
Manuals
 English
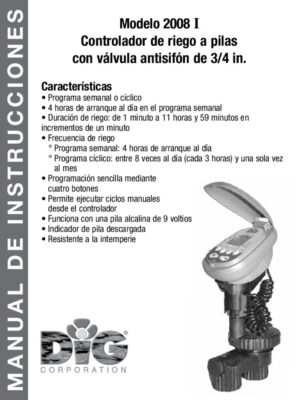
  Spanish
 About
This battery operated controller with ¾” inlet and outlet with female pipe thread should be installed a minimum of 6” above the highest sprinkler onto a 3/4” PVC male pipe thread fitting or riser as part of your drip irrigation or sprinkler system valve manifold, or as a stand-alone unit. Make sure that the flow direction arrow engraved on the side of the controller is pointed away from the water source.
Recommendations: Wrap all fittings with TEFLON tape. Do not use pipe cement (solvent) or pipe dope on the valve as it will damage the valve thread and void the warranty. Do not over tighten.
Programing: To program the controller use the six programming buttons with the four upper buttons used for programming, the button on the lower left used for manual on/off and the button on the lower right used for rain off or to stop irrigation when it is raining
Battery
This battery operated controller requires one 9 volt battery (alkaline battery recommended)
- To install the battery, lift the blue controller from the skirt or sleeve it sits in and use a firm pressure to lift the battery compartment cover in the back of the unit.
- Insert a new 9 volt battery and lock down the battery in place. The polarity is marked for direction.
- Replace battery compartment cover in its proper place, ensuring a triangle is formed on the underside of the controller.
- Insert the controller back into its skirt or sleeve.
Installation into a PVC pipe or to pipe thread
- If installation is into a PVC pipe, first shut off the main water supply.
- We recommend installing a 3/4” ball valve or gate valve before the battery operated controller. This ball valve can be very useful as an emergency backup to turn the system off. This type of arrangement is used by professional installers.
- Turn the water supply on to flush the line and then shut the water supply off using the new ball or gate valve.
- Install the controller a minimum of 6” above ground, wrapping TEFLON tape on all the male thread fittings used.
- Turn the water supply on again to pressurize the system. The controller will open momentarily and then will shut off.
- Test the controller using the manual on/off button located on the lower right side. Press the button. A click will be heard, indicating that the valve is open, and the controller will turn on. A Manual Run icon will appear on the lower side of the screen. Make sure that the sprinklers or drip systems are working correctly. Press the button again and the controller will turn off.
- Program the unit.
- If the unit is installed with a drip irrigation system, make sure to install a filter with 150 mesh screen or higher to protect the drip system, then add a 15, 25 or 30 PSI pressure regulator to lower the pressure, following with a swivel adapter to the drip tubing or ¾” PVC threaded x slip adapter to the PVC line.
Review the instruction manual included with the unit for details.